So I was cruising my local Chanel counter and spotted the most gorgeous compact on display! The Poudre Signee de Chanel Illuminating Powder is part of the Spring Printemps Precieux de Chanel collection and is so stunning!! At first I thought, "do I really need another highlighter? I mean I really do love my Laura Mercier. And at $68 maybe it's not the wisest buy if I'm happy with my current situation". Whatever. Once I saw the applicator, I quickly squashed my inner voice. The applicator is like a giant eyeshadow sponge which allows it to deliver the perfect amount of color at the perfect angle to highlight cheekbones or you can use with a fluffy brush for an all over 'lit within' radiance. Genius!! And the finish is flawless, as if you've been airbrushed. While I need to be careful when applying the Laura Mercier (ive swatched it below, Chanel on the left, LM on the right) because it tends to deposit too much color, this is a beautiful peachy pink beige that's very light and sheer. If your looking for a highlighter that highlights your skin and not itself, try this! I didn't have too much time to spend looking at the rest of the collection, but I will be going back! The blush in Frivole is calling my name!!
xo
Poudre Signee de Chanel Illuminating Powder
Wednesday, January 16, 2013
Labels:
Chanel,
highlighter,
illuminating powder,
Laura Mercier,
Poudre signee,
shopcitygirl,
spring
Obsessed with Obsessive Compulsive Cosmetics!
Thursday, November 29, 2012
Ok, so I bought these awhile back because I LOVED the rich tones, however I hadn't actually worn them...until now! Let me tell you, these are soo lightweight, pigmented and not drying that they are perfect for all the holiday events coming up. I like to prep with a little lip balm before hand and then I "line" my lip with the lip tar itself using the little brush it comes with and let set to form a barrier, then fill in with my color. If you want your lip stick to last this holiday season, try OCC Lip Tar! And at only $16 each, you'll be glad you did!!!
Colors shown: NSFW (a true balanced red) & Strumpet (a hot raspberry pink)
A few new lovelies!
Thursday, August 16, 2012
I picked a few new goodies this week and thought I'd share!
1. Love these shades! And they'll transition so nice into Fall! Chanel Taffetas Rose, YSL in Rouge Muse and NYX lipliners in Pumpkin, Fuschia and Plum. They're so creamy you can wear them alone with lip balm!
2. Laura Mercier Mineral Illuminating Powder: This came highly recommended to me and it did not disappoint!! Literally makes skin look soft, radiant and youthful!!
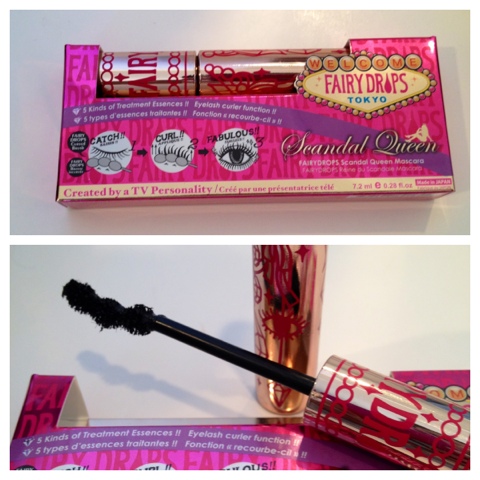
3. Fairy Drops Mascara: I debated between this and the YSL Shocking which I love but this seriously a rich, shiny black and gives an amazing curl to lashes that holds throughout the day!
4. Ell & Emm: These are a few goodies from my besties Etsy shop (say that a few times!) I love to layer my wrists with pretties and these 3 are classic new additions!! Love them!!
5. Makeup bag: I'm currently obsessed with anything that has studs! This one is perfect for all my new goodies!! :)
1. Love these shades! And they'll transition so nice into Fall! Chanel Taffetas Rose, YSL in Rouge Muse and NYX lipliners in Pumpkin, Fuschia and Plum. They're so creamy you can wear them alone with lip balm!
2. Laura Mercier Mineral Illuminating Powder: This came highly recommended to me and it did not disappoint!! Literally makes skin look soft, radiant and youthful!!
3. Fairy Drops Mascara: I debated between this and the YSL Shocking which I love but this seriously a rich, shiny black and gives an amazing curl to lashes that holds throughout the day!
4. Ell & Emm: These are a few goodies from my besties Etsy shop (say that a few times!) I love to layer my wrists with pretties and these 3 are classic new additions!! Love them!!
5. Makeup bag: I'm currently obsessed with anything that has studs! This one is perfect for all my new goodies!! :)
Labels:
Chanel,
Etsy.com/shop/ellandemm,
Fairy Drops,
Laura Mercier,
NYX,
ysl
Loving right now: Peter Pan Collars
Friday, August 10, 2012
So, I'm thinking I need some Peter pan collars to revive the wardrobe for fall! I love the idea of breathing new life into a stale lbd with a sparkly little number. And i love the idea of layering a collared shirt under a sweater but absolutely can not stand the bulk but a crisp little Peter pan collar would definitely solve that! And there's so many options...studs to sequins, lace and neon...the possibilities are endless!
Labels:
Kate Spade,
Peter pan collars
Black and White: DIY
Thursday, March 22, 2012
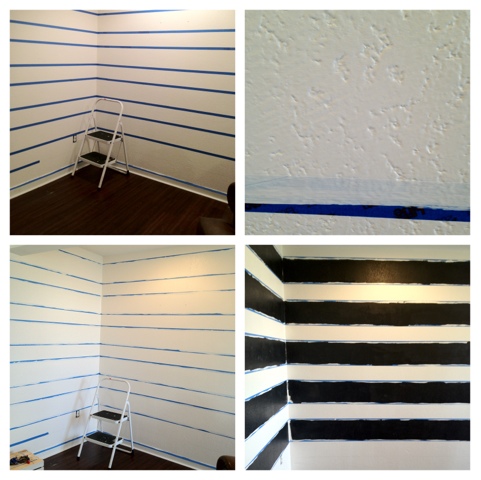
Soo this weekend I finally decided to bite the bullet and tackle a big DIY project I've wanted to do for some time...stripe my walls! I must admit, this took waay longer than I thought it would and my arm is still sore a week later but the results are better than I expected!
My walls are textured with an "antique lace" finish (or that's what my husband claims at least!) so I had to do a few extra steps to ensure clean lines.
1. Paint your base color and mark/measure stripes. I did 8 inchers
2. This not your typical blue tape! It's the 3m brand for delicate surfaces... trust me, this matter!!
3. When your stripes are masked, Ho over the lines that you will fill in with the base color.. Again! This forms a little seal so color won't bleed. I did this twice! See why it took so long?!
4. Lastly, I gave the stripes 2 coats of color, in my case black!
This technique involved a bit more than i thought, but totally paid off: my lines are crisp, clean and i love, love, love the end result!!!!
What do you think??
My walls are textured with an "antique lace" finish (or that's what my husband claims at least!) so I had to do a few extra steps to ensure clean lines.
1. Paint your base color and mark/measure stripes. I did 8 inchers
2. This not your typical blue tape! It's the 3m brand for delicate surfaces... trust me, this matter!!
3. When your stripes are masked, Ho over the lines that you will fill in with the base color.. Again! This forms a little seal so color won't bleed. I did this twice! See why it took so long?!
4. Lastly, I gave the stripes 2 coats of color, in my case black!
This technique involved a bit more than i thought, but totally paid off: my lines are crisp, clean and i love, love, love the end result!!!!
What do you think??
Labels:
black and white,
DIY
Obsessed with Sock Buns
Monday, March 19, 2012
In case you're living under a rock and have not heard about sock buns, here's yet another post on them as I just recently decided to take the plunge and try it. I love how they can easily look casual chic or completely sophisticated!!
The first image is one I found on Hellogiggles.com. The second is moi's first attempt. Not too shabby! ;) Have you tried the "sock bun" yet?!
Love the ones your with! ❤
Wednesday, February 15, 2012
Since Valentine's landed on a school night this year, the husby and I opted for an evening in with our 2 boys. It was absolutely perfect! From the heart shaped pizza to the double chocolate fudge cake (decorated by them, of course!) this year was truly about being surrounded by those I love and cherish the most. Hope you all had a happy heart day!
PS: I think my oldest definitely has my creative gene. He made the card below by up cycling ones we had and even slipped in a few dollars of his own money for my daily coffee stop. Sweet boy!!
Subscribe to:
Posts (Atom)